Translate

Showing posts with label flowers. Show all posts

Wednesday, 23 April 2014

Wah daisy nails

Step 1- Paint your nails black (or whatever colour you want).
Step 2- Use a dotting tool or nailart pen to create 5 white dots in a circle. You can just do 1 of these on each nail or a few depending on how long your nails are.
Step 3- Paint a line half way through each dot starting from the inside of the circle (does that make sense? Have a look at the picture). Use a striper to do this.
Step 4- Make a yellow circle using a dotting tool or nailart pen in the middle of the circle of white dots.

Thursday, 10 April 2014

Daisy nails

This design is very simple and easy to do. I started out painting my nails red then used a dotting tool and yellow polish to do the centre of the flowers then used a dotting tool and white polish to do the centre.

Friday, 14 February 2014

Valentine's Day Nails

These are my Valentines Day nails. For these nails I used Pinstripe White by NYC and Strawberry Tart by Models Own for the base of my nails. I used Pinstripe White on my thumb, middle and little finger and Strawberry Tart on my index and ring finger.
On my middle three fingers I wrote I <3 you. For the 'I' and 'you' I used my white Barry M nail art pen and for the '<3' I just used the brush that came with the polish and drew a V shape with it and rounded off the tops. I then used my black Barry M nail art pen on these nails to draw a shadow.
For my thumb and little finger I started off by dabbing 3-4 little spots of Strawberry Tart randomly around my nail then added two little spots of Barry M Key Lime to each pink spot to resemble leaves. Once that had dried I used my black Barry M nail art pen to outline around the roses and the leaves. I didn't completely outline them, I used 2-3 little lines around the roses and 2 to outline the leaves then I drew one or two marks on the inside of the roses and finished everything of with a topcoat!

Friday, 29 November 2013

Lilac and glitter flowers

For this design I painted my nails lilac and then used a silver glitter nail art pen for the flowers. To do the flowers I started off by doing a dot in the middle to work from then drew four petals around the dot. I did a couple of these flowers on my accent nails and only one big flower coming off the nail in different positions on different nails for the rest of my nails.

Wednesday, 4 September 2013

More Polka Dots and Flowers

I have another polka dot and flower design today, I did it quite a while ago, so I can't remember the polishes I used, but here it is....
I did a grey base with mint polka dots, then painted white flowers coming off the nails in a different place on each nail. I then painted the middle yellow, added pink polka dots to the petals and white polka dots to the yellow centre and finished off with a topcoat!

Tuesday, 27 August 2013

Flowers and polkadots

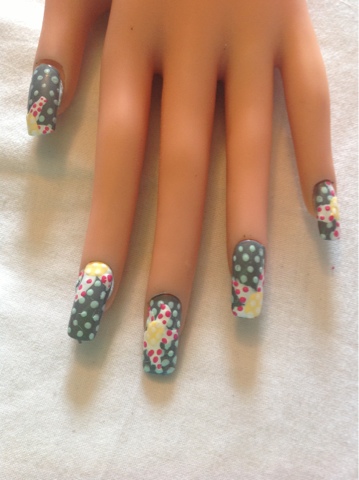
 This design is a flowers and polkadots design that I did on my friend's nails. These nails are inspired from a Wah design and I did them to enter into a competition on instagram. The theme for the competition is flowers and polkadots and it's hosted by nubbinnails. If you want to have a look at my instagram so you can see some of my older designs my username is carysdoesnails.


For this design I used-
Barry M Matt White for the base

Models own Apple Pie for the polka dot background


Models own Strawberry Tart and Nails inc. You're a Peach for the flower


Illamasqua Smash for the leaves. I lost the top of the bottle quite a while ago... oops.


And Andrea Fullerton dot and flick in black for the detail.


To begin with I painted my friend's nails white.


That's her drying her nails with my monkey nail dryer.
 
Then I added small polkadots in apple pie 


Once I'd done that I put 1-2 blobs of Strawberry Tart and You're a Peach onto each nail.


Then I used Smash to add leaves.


And to finish off the look I outlined the flowers and leaves with the striper part of the dot and flick then used the pen to draw two curved lines inside each flower then completed the look with a topcoat.


The thumb smeared a little when I put the top coat on :(